
Go ahead; type the phrase “how important is audio in video” into Google and see what you get. Now, I don’t expect you to read through all 228 million results, but just reading the summary of the first few on the initial results page is enough to indicate that there are a lot of people out there saying that great audio is at least as important — if not more important than — great video to any video project. If that’s true, and so many people agree that it is true, then why do so many video professionals spend less time on the audio in their projects than the video? And why do so many non-linear editing applications provide such weak audio tools?
Well, the developers of VEGAS Pro asked these same questions. That’s why when VEGAS Pro was introduced almost 15 years ago it was an audio-only application. That’s right; your favorite video editor started life as a powerful audio multitrack recording, editing, and production tool. The development team made sure to get the audio right before introducing the video tools. And these audio tools have continued to evolve since then. That’s why VEGAS Pro is still second to none among non-linear video editing applications when it comes to audio.
In this article, I’d like to explore some of the topics involved with crafting the perfect audio for your video projects. I’ll use VEGAS Pro for this discussion, but most of what I’ll talk about works the same way in all versions of the software in the VEGAS line. Here I’d like to pull many audio-related features together so that you can get a good sense of what these tools are and when you might like to use them in your projects.
Of course, as the first step to working with audio in your projects, you have to make sure to set up your computer so you can hear — and if you want to — record audio. In simple computer setups (like your laptop), the audio just works and you don’t need to do anything extra. However, if you have more sophisticated audio gear and use an audio interface device other than the device built into your computer, then you might want to do a bit of setup before you start working.
To do this setup, choose Options | Preferences in VEGAS Pro. Click the Audio Device tab. By default, the Audio device type points to Microsoft Sound Mapper. This means that VEGAS Pro will send its audio to whatever hardware output you have your Windows sounds set to use (usually a built-in audio device). If you’ve installed a more professional audio device, chances are that device utilizes its own software drivers which provide a more efficient audio signal flow. For example, you can see in Figure 1 that I use an audio device that utilizes ASIO drivers for optimal performance. Most professional-level audio devices feature these ASIO drivers and if yours does, you should point to them here.
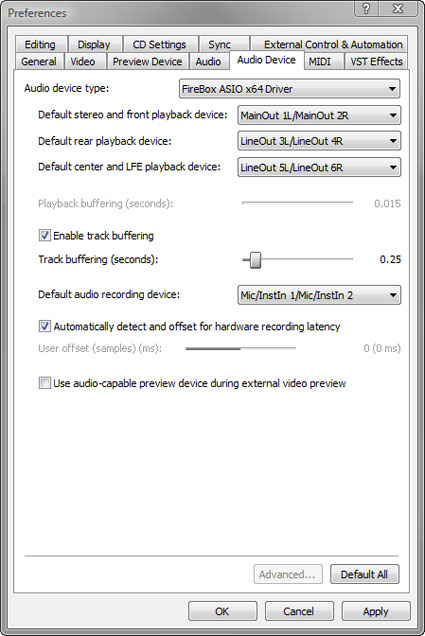
Set the Default stereo and front playback device setting to point to the outputs on the audio device into which you’ve plugged your speakers. If you have a 5.1 surround sound setup, point your Default rear playback device and Default center and LFE playback device settings to point to the appropriate hardware outputs as well.
Finally, set the Default audio recording device to point to the hardware input that you will typically use for recording. When you’re done with these settings, click OK. (In most cases, you won’t need to change the other settings on this tab.)
Now that you’re set up to hear your audio, add an audio file to your timeline. If you’ve used VEGAS Pro at all, then you’ve done this many times. If you’ve never done it before, simply drag the audio file to your timeline and it is there, ready to be edited. If you drag a video file to the timeline, its corresponding audio lands on a separate audio track.
Once you have the audio in your project, you have countless options on how to proceed and how to work with that audio. First, play your project to ensure that you can hear the audio. If you can’t, you may need to review your hardware setup to ensure your speakers are properly connected and that the software is routed correctly in the preference settings (which we just discussed).
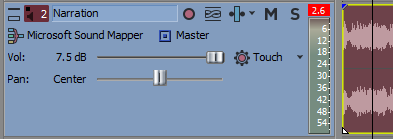
Let’s concentrate on a few audio features that I think can make a real difference in most projects. First, play your project and watch the peak meters for both the audio track and the Master bus. If either of these meters lights up with a red box, as in Figure 2, your audio is too loud and will begin to distort because of digital clipping. Digital clipping occurs (simplistically) when your audio is too loud. You can always consider it a very bad thing which may cause your audio to sound distorted. To avoid this clipping, notice the number inside of the red box. This value represents how much over the clipping threshold (0.0 dB) the audio has gone. Adjust the Volume slider on the track down by at least the value in the red box. Click the red box to reset it and play the project again to see whether or not you have fixed the problem.
If you have more than one track of audio, you will need to monitor the Master meter especially carefully. Even though two tracks may not clip individually their combined output may clip the Master. If this happens, either lower the volume of both tracks or lower the master volume until clipping no longer occurs.
Don’t forget that a track’s volume will not always necessarily be as loud as it can be without clipping. Most times you’ll want to lower the volume of some tracks so that they mix in better with the overall sound. For instance, if you have music and narration, you’ll probably want to lower the volume of the music substantially so that you can hear the narration clearly.
Two other tools become indispensable when you have more than one audio track. Refer back to Figure 2. The Solo button on each track enables you to hear the output of just that track. This helps you focus your attention on the audio from just one track — or the mix of a group of tracks if you click the Solo button for more than one — so you can identify and fix any problems with it. The Mute button works in just the opposite way. It silences any track on which it is engaged. This is great when, for example, you want to silence a video track’s original audio track, but don’t want to delete that audio completely in case you need to reference it again later.
The Track FX button enables you to apply various audio effects and filters to all audio events on a track. For instance, say you want to apply a subtle echo effect to the narration. When you use this button, the echo affects all the audio on this track. You can apply an effect to individual events on a track too. Use the Event FX button, located on an individual event for that.
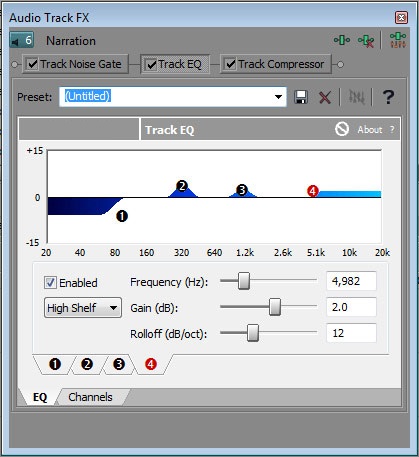
Click the Track FX button for your audio track now. This opens the Audio Track FX window and you can see that your track already has three effects on it: Track Noise Gate, Track EQ, and Track Compressor. These three filters are very commonly used and so we’ve applied them to each track automatically. However, in their default states, they have no affect on your audio (or your computer’s processor), so you don’t need to worry about them until you want to use them.
Briefly, the Track Noise Gate cuts out any audio on the track that is quieter than the Threshold level setting. This can be an effective way to remove unwanted sounds — like breath noises — from the audio on a track.
The Track EQ, shown in Figure 3, is the one you’ll probably use most often. An equalizer — EQ for short — enables you to raise or lower the volume of specific frequencies or frequency ranges in your audio in order to shape the sound. It’s like the Bass, Mid, and Treble knobs on a home stereo system, but more sophisticated, more flexible, and more powerful.
The third plug-in in this chain, the Track Compressor, helps you even out the volume of the audio on the track by compressing the dynamic range. In other words, it brings the quietest parts of the audio closer in volume to the loudest parts of the audio. This can be a tricky tool to use because it’s easy to make your audio sound worse with it than without, but it is a powerful tool when you know how to use it. To get started, I suggest you try some of the presets to see if they help your audio. As you get more familiar with how compression works, you can experiment by modifying those presets.
You can add additional effects to create a chain of effects up to 32 plug-ins long. To do that, click the Plug-In Chain button and choose the plug-in you want from the list in the Plug-In Chooser.
Automation tools can be invaluable when working with audio. For example, if you have music that should be loud until a narration track comes in, you can use a volume automation envelope on the music track to turn it down when the narration starts and back up when the narration finishes.
In a similar way, you can automate the pan setting. Panning refers to where in the stereo space you place the audio. Is it all in the left speaker, all in the right speaker, or a bit in both? If equal volume comes out of both speakers, the audio will appear to come from the midpoint of the space between the speakers. As the audio is panned left, for instance, it becomes louder in the left speaker than the right and appears to come more from the left side of the screen.
Now, say you have a car zooming by the camera and across the screen from left to right. You could use a Pan envelope to automate the audio so that it comes first out of just the left speaker and then sweeps across until it ends up coming out of just the right speaker. Now as the car zooms by on screen, the experience seems more realistic because the audio also zooms from left to right in the stereo field.
A very powerful tool that you should not overlook enables you to automatically raise the volume of your audio to use the entire available dynamic range. The process is called normalization. When you normalize audio, you have the software turn it up as loud as it can go (or to a specified level) before its highest peak begins to clip. This helps you avoid having audio that’s too quiet in your video. To normalize audio in your VEGAS Pro timeline, right-click the event that holds the audio and choose Switches | Normalize from the menu. Unless the audio was already as loud as it can be, you’ll see the waveform in the event grow. How much it grows depends upon how far away from the normalization setting the highest peak in that event was. When you use normalization in conjunction with compression that we talked about earlier, you can make your audio appear louder overall. Remember, compression decreases the distance between the loudest and the quietest parts of your audio, so when you compress and then normalize, you essentially increase the volume of a greater portion of the audio. Yes, it’s a bit confusing at first, but as you experiment with these tools, it’ll start making more and more sense to you.
Sometimes one very high peak prevents audio that’s obviously very low from normalizing to a higher, more acceptable level. If this happens, and applying compression doesn’t solve the problem, split your event and isolate the high peak in an event by itself. Then normalize the other events that hold the remaining audio. Keep in mind that you might first have to turn the Normalize switch off and then back on to have the software recalculate the proper normalization.
You can also record new audio directly onto your VEGAS Pro timeline. This can be immensely helpful when you want to record a narration and need to see your video as you narrate.
Audio in VEGAS Pro goes so much deeper than what I’ve discussed here, but these audio basics are enough to get you started. You can get as sophisticated with your audio inside of VEGAS Pro as you want. For instance, if you master the Mixer window and all of its tools, you’ll be amazed at the power and flexibility you have at your disposal for every project you work on. If you’re not taking full advantage of the audio tools in VEGAS Pro, you may be missing out on an important way you can take your video productions to a higher level of quality and impact.
If you want to create your own perfect audio for your next video project you may want to try the free 30-day trial of VEGAS Pro! If you want to have more information and inspiration, also visit our VEGAS forum.
Tip: Give your video sound a professional polish
Take a look at three of the most commonly used professional FX, the plugins added by default to every VEGAS Pro audio track: the noise gate, the equalizer, and the compressor. As with all audio effects, you can apply these plugins at the event, track, bus, or master levels.