
When you want to take your video productions beyond simple point-and-shoot, you can shoot the scene from more than one angle to “take it up a notch.” In fact, it’s not unusual to shoot the same scene from different angles with four or more cameras. Take an interview, for instance. You might have one camera on the interviewer, another close on the interviewee, a third shot that shows both of them together, and a fourth for audience reaction.
Of course, you need to deal with a lot of logistics on set, and in the same way, you have a challenge to edit all of this footage. You want to easily cut between cameras to create your final project. VEGAS Pro has long provided a clear and easy way to edit a multiple-camera (multicam) presentation, and now with the release of VEGAS Movie Studio 14 Platinum, we bring that same powerful workflow to Movie Studio Platinum users. We’ll discuss the multicam workflow in this article. I’ll use the name VEGAS in a general sense to refer to both VEGAS Pro and VEGAS Movie Studio Platinum. Where differences exist, I’ll make sure to point them out specifically.
To understand how the multicam tools work, it helps to understand the concept of takes in VEGAS. You can use takes—a unique and innovative feature of VEGAS in its own right—for a number of reasons, and we’ve leveraged them to provide an easy multicam workflow. So, what is a take?
You might have always wondered why in VEGAS, we use the word event or the term timeline clip event in reference to the video on the timeline instead of the word clip. Takes account for the answer. In most non-linear editing (NLE) software, when you add a media clip to your timeline, you have just what you’d expect: a media clip on the timeline. But in VEGAS, you have more than that. You have a container on the timeline which holds your clip, and thanks to the takes feature, that container can hold multiple media clips. We call the container an event.
I won’t go much further into what you can do with takes in general, except to say that you can easily change which take you want to use for your project as you’ll see later. When you play your project, you’ll see just the clip that you’ve designated as the active take for that event. If you never add more than one clip to the event, then you don’t need to worry about it—only one take exists and that’s the one that plays when you preview the project.
With that basic understanding of takes, we can talk about how VEGAS leverages takes to make it easy for you to edit a multicam project. I’ll limit this discussion to four cameras since that’s what VEGAS Movie Studio 14 Platinum supports (for all practical purposes, VEGAS Pro supports an unlimited number of cameras) and four illustrates the workflow nicely. I’ll take you through the process of adding four camera clips to your timeline, combining them into a single multicam clip event, calling your camera shots in real time, and editing your cuts and calls after the fact to get exactly the edit you want.
The only thing I’ll say about the process before you get to VEGAS is that to make your life easier, you should create noticeable synchronization points in your video. Record audio to each camera (whether you intend to use it in the final video or not) and include something like a visible and audible clapboard on each camera at the same time. If you don’t have a clapboard, have someone clap their hands in view of each camera.
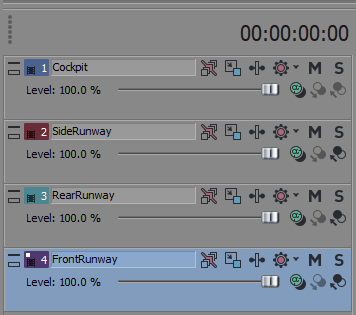
When you’re ready to edit the footage from the four cameras, add the media from each to separate tracks in your timeline. It helps to name your tracks with something descriptive so you can easily identify it by name later, so double-click the scribble strip for each track and enter a name as shown in Figure 1.
Next, you need to synchronize your footage. Now that audio you recorded to each camera really helps. If you’ve used a clapboard, you can easily see that in the video and see the sudden spike in the waveform of each camera where the audio of the clap was recorded. Line those audio spikes up and your cameras will be nicely in sync. Don’t forget that once you get close, you can zoom in on your timeline to do the fine tuning. You might notice that you can’t line them up perfectly because the video wants to jump to the nearest frame. To avoid this, choose Options | Quantize to frames to turn that feature off. Now you can line the waveforms up perfectly. (Important: make sure to turn Quantize to frames back on so you don’t cause unexpected problems later in your edit!)
VEGAS Pro also provides two automatic synchronization methods. If you record timecode from a common source to each camera during the shoot, you can use that timecode to instantly align your clips. Also, if you’ve synchronized the clocks on each of your cameras, you can use date and time stamp information to synchronize the footage. You can find options for both of these under Tools | Multicamera. They can save you a lot of effort and yield great results quickly.
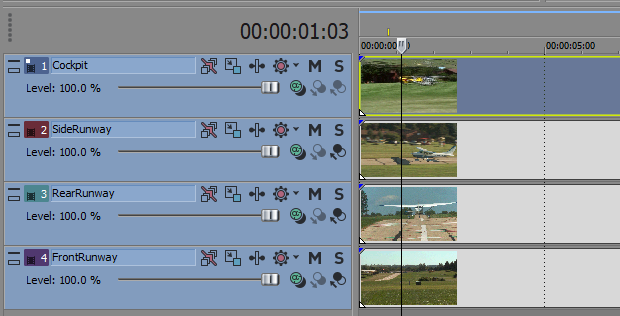
Now that you have your footage from each camera synchronized, click the track header for the first video track to select it, then hold the Ctrl key while you click on each of the other video tracks to add them to the selection as in Figure 2. In most cases, you won’t need (or want) to include the audio tracks, so don’t select those, but VEGAS Pro lets you include the audio if you want it. Choose Tools | Multicamera | Create multicamera track. This combines each of the selected tracks into a single multicam track. You can see the video in the top track has been used in the new track event’s thumbnail. To make it easier to identify which camera you’re looking at, choose View | Active Take Information. Now the name of the active take appears in the event.
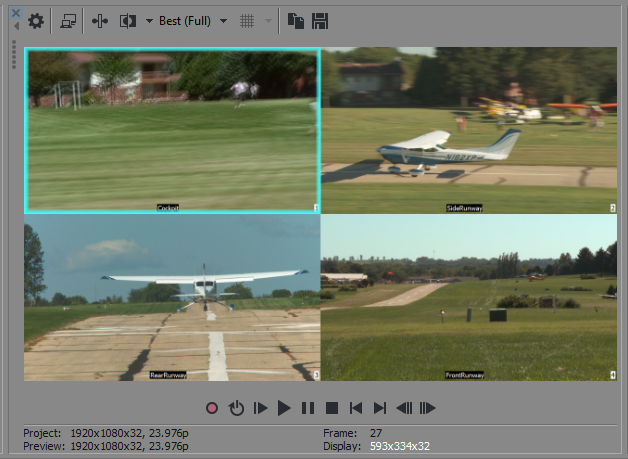
You’re almost ready to start calling your shots. Choose Tools | Multicamera | Enable Multicamera Editing. As you can see in Figure 3, the Video Preview window now shows the output from each camera and that the currently active clip’s output has a blue outline.
Now here’s where the fun really starts. Return your playback cursor to the beginning and play the project. As it plays, monitor the output of each camera. To change to a different camera, click that camera’s output in the Video Preview window. The blue outline switches to show the new active camera. Continue clicking the various camera outputs to switch camera angles. You can also type the number of the camera on your keyboard’s 10-key number pad to change cameras.
Each time you switch cameras, VEGAS splits the timeline event and switches the active take to the camera you chose, creating a jump cut between the two cameras. If you’d like a crossfade between two clips, hold the Ctrl key when you change cameras.
If you’re using VEGAS Pro and an external monitor during this process, you can choose to see the full frame in that external monitor. This enables you to be in multicamera mode in order to call your shots, yet you, a colleague, or a client can still watch the output in full screen mode. To do this, choose Tools | Multicamera | Show Full Frame in External Monitor.
Once you’ve called all your shots, choose Tools | Multicamera | Enable Multicamera Editing to exit multicam editing mode. Play your project, and watch as your video switches cameras according to your shot commands.
It’s possible—in fact, probably likely—that you won’t be 100% satisfied with the calls you made. You might wish you switched to a different camera than the one you chose. Or, your timing might have been off just a bit and you wish the cut was sooner or later. Now that you’re no longer in multicam editing mode, the events on your timeline are just like any other events you created in the normal course of editing, and thus you can edit them however you feel you need to.
For instance, say you switched to camera 2, but now you’d rather go to camera 4 at that point. To correct this mistake, right-click the event that holds the clip you want to change. From the context menu, choose Take. In the cascading menu, you see the list of takes the event holds. Choose the take you’d rather switch to and the event on the timeline updates to the new angle. You can do this for every event in the combined multicamera track.
If you don’t like the timing of an edit, use standard event trimming techniques to change the point at which one event cuts out and the next cuts in. Here’s a handy tip for you: when two event butt right up against each other (creating a jump cut from one to the next) you can trim the edges of both simultaneously. To do this, point to the edges and hold Ctrl+Alt to enter into Trim Adjacent mode. Now trim one of the events as you normally would and both events are trimmed simultaneously. This is a very quick way to time your cuts perfectly.
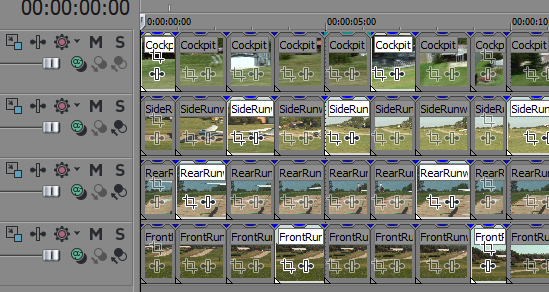
Finally, in VEGAS Pro you can expand the multicam track back out to individual tracks. There might be a number of reasons you’d want to do this. To do it, choose Tools | Multicam | Expand to Multiple Tracks. A dialog box lets you decide whether you want to discard all of the unused events or keep them (in case you want to change camera angles again later). To keep the unused events, click Yes. This breaks your project back out into multiple tracks as in Figure 4.
And that pretty much completes the multicam workflow in VEGAS Pro and VEGAS Movie Studio 14 Platinum. These simple, yet powerful tools make it easy to create sophisticated multicam edits. And, along the way you learned a few other useful techniques that the software uses to provide the multicam tools which you can also use in a number of different situations.