We spend a lot of time discussing the wonders of VEGAS Pro as a nonlinear video editor—and with good reason. But as we discuss the sophisticated features the application provides for creating your video edits, we often overlook the fact that VEGAS Pro is also an incredibly powerful audio workstation. The audio-related features in VEGAS Pro have set the standard by which all other nonlinear editing applications are judged and no other has surpassed—or even matched—what VEGAS Pro enables you to do with the audio in your video projects.
In this article, we want to focus on a basic—but powerful—function: recording a voiceover narration into your video project.
Recording a voiceover narration:
In fact, the basics of recording that we’ll discuss in this article are the same whether you’re recording one track of narration or 24 (or more) tracks of a multitrack music recording of a band. Once you learn how to set your project up to record a narration track, you’ll understand how to set up as many tracks as you need to record multiple sources either one by one or simultaneously.
Say you have a video project under way. You’ve cut together all of the footage you shot and now it’s time to record a narration. Further, say you don’t have—or even want—a script for this video. You’d like your narration to be more of a free-form monologue based on the imagery of the video. One beautiful thing about having powerful audio tools wrapped up into your powerful video-editing software is you can record your free-form narration even as you view the video—all in the same project!
To set your project up to record, first choose Insert | Audio Track to add a new track to record onto. Now you must give some attention to your audio routing setup. The hardware gear you have available to record with will dictate how you set things up. It will also have a lot to do with the quality of your results, so you want to make sure you’ve given these hardware choices a lot of thought.
Nearly every personal computer you can buy today has a build-in audio device, sometimes called a sound card. These devices are typically capable of both recording audio and playing it back. But that’s about all that can be said for them! The built-in audio devices on most computers are typically of very low quality with cheap components. In the spirit of, “you get what you pay for,” such devices are not likely to create very high-quality recordings. In fact, they may not produce even adequate recordings.
Another critical component is the microphone you use. And the two are not entirely unrelated. If you use a microphone that’s supported by the inputs of your computer’s onboard audio device, you’re probably using a very inferior microphone that will likely make even more inferior recordings. If quality isn’t really important to your project—you just need to record some audio notes, say—then maybe you can get by with the cheap audio device and the cheap microphone that came with your computer. But if you need high-quality audio for your project, you’re going to have to look at making a modest investment in gear before you can really go much further.
You don’t have to spend much more than $100 for a decent-quality microphone that will make all of the difference in the world for your recordings. Or, you can spend thousands for top-of-the-line gear for something that delivers pristine results. Most of us settle somewhere in between and acquire a nice, versatile microphone that can cover a variety of needs. Just make sure whatever you purchase can take the stress of the situations you’ll be recording in. For example, if you need to do location audio recording, you’re probably wise to avoid a fragile expensive vintage ribbon microphone!
Your setup can be as complicated or as simple as you want it to be. For instance, you can find pretty decent USB microphones these days. This type of microphone bypasses your audio interface completely and connects directly to your computer through a USB port. Such a setup might be a good option for many people.
On the other hand, some higher-quality microphones require extra power. That power might come from a battery, or it might come from a secondary source, known as phantom power which can be provided by some video cameras, audio interface devices, or mixing boards. You can avoid the issue altogether by using a microphone that doesn’t require this extra juice.
Assuming you want something more high-quality than most USB microphones, then you’ll have to plug your microphone into an audio interface and since, as we already discussed, your computer’s built-in audio interface isn’t likely up to the task, you’ll have to look into buying something new. Going with our assumption that we simply need to record a narration, you don’t need an interface with a huge number of inputs. Many nice audio interface devices provide one or two high-quality microphone inputs directly, thus helping you avoid a complicated setup where you must first run the signal through an audio mixer.
All of these hardware decisions are really outside of the procedure for recording into VEGAS Pro, so we won’t spend much more time on them. Just suffice it to say that the old adage, “garbage in, garbage out” applies here. If you have inferior hardware—microphones, audio interfaces, etc.—and you record into VEGAS Pro with that hardware, you will end up with inferior recording results and it won’t be the fault of VEGAS Pro! In short, VEGAS Pro will do the right thing—it will make a very high-quality recording of your very low-quality audio, thus preserving the original low-quality audio perfectly! So do a little research and find out what you need to have in order to create high-quality audio because VEGAS Pro will perfectly preserve that too.
Now that you have your hardware decisions out of the way, we can proceed with recording in VEGAS Pro. First, you need to tell VEGAS Pro where to “listen” for the audio signal you want to record. To do this, choose Options | Preferences. In the Preferences dialog box, click the Audio Device tab.
Most high-quality audio interface devices utilize ASIO drivers. These are highly efficient and prevent latency—a noticeable delay in the audio. To utilize these drivers, select them from the Audio device type drop-down list as in Figure 1. If you’re using a USB microphone, its driver will also appear in this list, so select that.
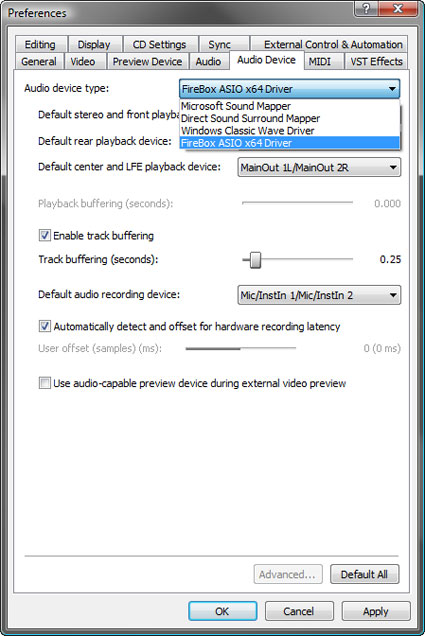
Next, some audio interface devices feature more than one input for a microphone or other audio source. You can set the default input from the Default audio recording device drop-down list. But don’t worry; you can override this later on the track you’re recording onto if you want. When you’re done making your choices, click OK.
Before you start recording, you’ll need to consider unwanted sounds getting into your audio. Of course, you need to consider obvious issues like noise from the surroundings: air conditioning, other people walking about, even the computer you’re using. You want to find a very quiet room in which to record. You also want to try to find—or create—a “dead” space. A dead space is one in which sound does not bounce around and create echoes. A high school gymnasium is not a good choice because it’s quite the opposite of a dead space with sound waves bouncing all over the hard surfaces. A room with carpeted floors, cloth curtains, and other materials that can absorb the sound waves and prevent them from bouncing around is a much better choice.
But beyond these issues, you also have to consider the sound your own project might make. If you have music or other audio tracks in the project already, you’ll need to turn your computer speakers down so you don’t include the playback of those sounds in your new recording. Or, click the Mute button on any existing audio tracks in your project (other than the one you’re recording onto).
However, if you need to hear your project’s existing audio as you record the new audio, you’ll need to set yourself up with a pair of headphones or earbuds so you can listen to the existing audio without having it end up in your new recording. Just make sure not to have the audio you’re listening to playing so loud in the headphones that it ends up bleeding through to the microphone anyway.
Now you’re ready to record.
To make sure you’re seeing all of the controls in the track header for the track you want to record into, drag the bottom edge of the track header down to make it taller. Stop once you see all of the controls, as shown in Figure 2.
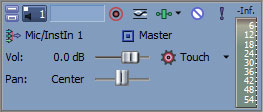
Not all of the controls you see on the track header relate to recording—in fact, only a couple do. Recall that you set the default record input back in the Audio Device tab of the Preferences dialog box and we mentioned then you can override that setting if you want to. To do so, click the Record Input button. From the drop-down menu, choose the name of your audio input device. From the cascading menu choose Mono or Stereo depending upon which is appropriate. If you’re using a single microphone, you’ll likely want to choose Mono here. Finally, from the next cascading menu, choose the specific input into which you’ve plugged the microphone on your audio interface device. Back in Figure 2, you can see that we’ve chosen Mic/InstIn 1 for our device. Yours may well say something different, but it should be similar.
Now, click the track’s Arm for Record button. In the Project Recorded Files Folder dialog box, browse to the folder into which you want to save your recorded file. Most likely you want to point this to the folder that holds all of your other project assets (or a sub folder in that main folder). Click OK.
As an aside, each project asks you to specify this record folder only once. To see this, click the Arm for Record button again to turn it off. Click it again to turn it back on and notice the Project Recorded Files Folder dialog box does not reappear. However, you can force it to reappear if you want to change your settings. To do this, click the Arm for Record button to turn it off yet again. Now, hold the Shift key and click the Arm for Record button one last time. The path is still set to what you specified a moment ago, but you can change it now if you want. When you’re done, click OK.
Notice a new peak meter appears in the track header as in Figure 3. This meter monitors the volume of the audio coming into the track, that is, the audio you are about to record. It’s absolutely critical that you make sure this meter never reaches 0 dB (at the right end of the meter) in order produce a good recording. If the peak readout at the right end of the meter turns red, the audio coming into the track is too loud and your results will be disappointing.
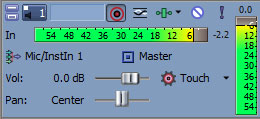
If that’s the case, turn the volume down on the recording input of your audio interface. Ideally, you want the loudest signal coming into the track to peak between -6 and -2 dB as mine does back in Figure 3.
You’ll also notice our track’s playback meter is registering audio. This indicates that the audio we are recording is running through the track’s signal path and out our master bus, which of course is connected to our speakers. If you need to hear the audio while you’re recording, then you’ll need to wear headphones to prevent that audio from looping through to the microphone again. Click the Record Input button and choose Input Monitoring On from the menu. If you do this without headphones and the playback audio comes out of your speakers instead, the audio from the microphone will come out of the speakers and back into the microphone and repeat that process indefinitely. This causes a feedback loop and you’re likely to hear a harsh, high ringing tone.
If you don’t want to wear headphones and don’t need to hear what you’re recording as you’re recording it, click the Record Input button. Choose Input Monitoring Off from the menu. This prevents the audio coming into the microphone from moving through the track’s signal path and out your speakers. You can turn this on or off for each individual track you’re recording onto.
Once you’re happy with your recording levels and have your input monitoring set the way you want, you’re ready to record. Click the Record button in the transport bar. The project begins to play and a new event appears on the track you’re recording onto, shown in Figure 4. The red waveform in the event indicates the audio you are recording and the event continues to grow as you record more material. When you’re done recording, click the Stop button.

The Recorded Files dialog box opens. If you know you made a mistake and don’t intend to keep this recording, select the recorded file and click Delete. Confirm you want to delete the file and then click Done. The event disappears from the timeline and you’re ready to try again. Do so now.
When you stop, the Recorded Files dialog box opens again. If you’re happy with the recording, click the Rename button and give your recording a new name. By the way; if you name the track you’re recording onto before you record, the new recording acquires the name you give the track, followed by a number to identify the specific recording. Click Done.
Now you can play your project and listen to what you have recorded.
Say you’re happy with the first half of your recording, but don’t like the second half. You can create a punch in recording and replace the second half. To do this, split the event at the point where the part you want to record over begins. Make sure the portion of the event that holds the audio you want to replace is still selected. Reposition your cursor to start before the selected event and click the Record button again.
VEGAS Pro starts to play, but the audio in your track is not replaced by newly recorded audio until the cursor reaches the selected event. VEGAS Pro only records into the selected event. Figure 5 shows our project where we have three events. The middle event is selected and the new recording ends up in that event, but not the first or third events.
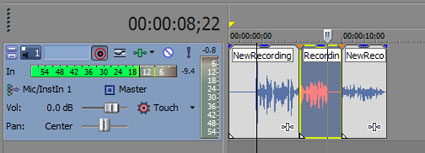
Once you’ve recorded over the selected event, it actually holds both the original and the new recording. Right-click the event and choose Take from the menu. You have several options in the menu, including the option to choose the take you want from the bottom of the menu. This way you can switch back and forth to find the take you like the best.
Recording a voiceover into VEGAS Pro really isn’t a complicated procedure once you have all of your hardware in place and set up properly. Still, there are several things that need to be in place to get the job done right and hopefully this article has given you a good idea of the issues involved.
For more training, including archives of articles like this one, free training videos, free archived webinar presentations, training DVDs, and more, visit this blog more often.