
The Trimmer window has been a part of VEGAS Pro since the very first version that featured a video editing tool set. However, the window has lead a somewhat conflicted life.
Most users might never even use the window. After all, the very innovation that made VEGAS Pro an instant and enduring success was the efficiency with which the user can edit directly on the timeline. No longer was it necessary to bring your video into an old-school source window first to define in and out points. Instead, VEGAS Pro made it possible—and in many cases even preferable—to drag a file directly to the timeline, quickly trim the clip event down so that it includes just the portion of the clip you want, and then get on with the rest of your edit. One never even need touch a source window.
Yet there are times when a source window comes in handy. For instance, if you’re looking for a short segment—or several short segments—out of a longer file, defining such segments in a source window can be a more efficient workflow. That’s where the Trimmer window comes in.
Over the years, improvements have been made to the Trimmer window, but to many it still seemed clumsy and slow. VEGAS Pro 14 introduces new hover scrub technology that has opened many eyes and given users a reason to take a new look at the window. With hover scrub, any time you point your mouse at the video portion of the Trimmer window, the video scrubs to show you the frame currently under the mouse. This makes it possible to quickly—or slowly if you prefer—drag your mouse through the file and find the part you want.
In addition, you can easily define a region of the file that you want to add to your project. For instance, drag your mouse across the video. You can drag right or left. When you find the first frame you want to include in your project click the mouse button. This moves the Trimmer cursor to that frame. In the past (and of course, you can still do this), you would then press the I key on your keyboard to mark this frame as you in point. Then you’d find your out point and press O. Thus defining your in and out points, you have identified a portion of your file to use when you add it to the timeline.
This process is even easier now.
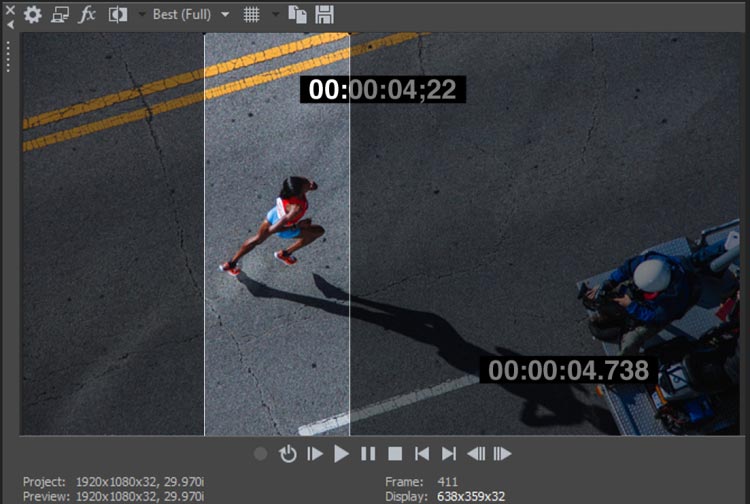
Drag through the video again, but this time when you find the frame you want to use as the in point, click and hold the mouse button down. With the mouse button down, continue to drag the mouse through the video. You can see that this dynamically changes the out point as you drag. When you find the frame you want as your out point, just release the mouse button. As you see in Figure 1, the sections outside of the in and out points appear darkened so it’s very easy to tell what’s inside the in/out zone.
Now that you have your in and out points set, wonder if you’re not satisfied with them? No problem; just repeat the process. But wonder if you’re happy with the out point, but want a different in point? Repeating the process forces you to reestablish both points, and you don’t want to do that. So instead, click the existing in point and drag it to a new frame. And of course you can do the same with the out point without losing the in point.
Once you have defined an area with in and out points, what next? Well, as you see, you can create new in and out points if you’re not satisfied with the ones you have. If you are satisfied that you’ve define the right region, you can add it to your project in the same ways you’ve always been able to with the Trimmer window. It might be easiest to point your mouse somewhere within the defined area, then click and drag that area to your timeline. This adds only the defined area to the timeline and ignores the rest.
But be mindful of how you drag from within the selected area. Not only is it possible to add the area to your timeline this way, but it’s also possible to reset your in and out points starting with a frame within the area. There is a small slice of the drag arc that will be considered a horizontal drag. This arc is roughly 20 degrees either up or down from perfectly horizontal. If you drag horizontally like this, instead of adding the selection to your timeline, you will reestablish the in and out points.
Sometimes this is exactly what you want to do, but other times you might do this inadvertently. If this happens to you and you accidentally “blow away” your carefully established in and out points, don’t panic or get too frustrated; you can easily get your selection back.
The VEGAS Pro timeline has always featured a way to scroll through your previous five time selections. To do so, just press your Backspace key. Each time you press it, you go back to the previous selection. Once you’ve gone back to the fifth selection, another press of the Backspace key cycles back around to the most recent selection.
We’ve brought this same behavior to the Trimmer window. So, if you’ve set your in and out and then while trying to add the area to the timeline you drag too horizontally and lose your selection, release the mouse button and press the Backspace key. This backs up one selection in the history, and you’re back to where you were. Try dragging to the timeline again, but this time make sure to drag more vertically to begin with.
As I mentioned, this hover scrub technique has many people taking a new look at the Trimmer window and maybe a new workflow. But as always, change that works for some, just doesn’t work for others. If for some reason hover scrub doesn’t fit into your workflow, you can easily disable it. To do so, right-click the video portion of the Trimmer and choose Enable Hover Scrub from the context menu to toggle it off. Now you’re back to your traditional Trimmer window behavior and back in business.
The whole idea remains the same as it has always been: VEGAS Pro provides flexibility and options for you to choose from in order to work in the most efficient way for your unique style. Maybe you never used the Trimmer window before, and maybe you still won’t use it that often. But for those times when it makes sense to use it, the new hover scrub functionality could make it an even more useful tool for you. If it doesn’t, well, turn it off—the option is always yours!
If you want to use the Trimmer window, here you can find the full version of VEGAS Pro.