VEGAS Pro 14 significantly increases the event Velocity envelope’s maximum range. This improvement expands the power of a host of already powerful tools inside VEGAS Pro that make it possible to create fast- and slow-motion video sequences with great control and accuracy. Let’s take a close look at these features to see how they work and what you can do with them. Along the way, we’ll talk about several other related features in VEGAS Pro 14 including a couple of new ones.
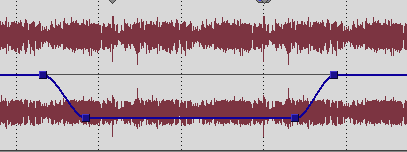
Let’s start with quick definitions of two important terms: envelopes and velocity. VEGAS Pro features several different automation envelopes. That term gives a clue for what these tools do: they enable you to automate your project. So, for instance, a Track Volume envelope enables you to change the output volume of a track over time. You can add key frames (points) to the envelope and set them to different values, as in Figure 1. As your project plays, the volume automatically rises or falls according to your keyframe settings. Some people refer to these as rubber bands, but in VEGAS Pro we call them envelopes.

Now, what is event velocity? Think of it as the speed at which a timeline event plays. By default, all events play at a velocity of 100% of the event Playback rate setting, which defaults to 1.0. In other words, by default all events play the video they hold at normal speed. Now I’ve introduced another term: playback rate, which also needs defining. Let’s sort all of this out.
Both the event Velocity envelope setting and the event Playback rate setting change the speed that the video inside the event plays back. So, let’s say you want to create a slow-motion effect where the star of the show jumps off of a cliff into the lake at a dramatic half of normal speed as he tries to escape the bad guy. To accomplish this, you could set the event Velocity envelope to 50%, or set the event Playback rate to 0.5.
We’ll discuss how to set both of these shortly, but first, why are there two ways to accomplish the same thing? That’s a fair question if we limit our thinking to this simple case. But wonder if you need to accomplish something a little more complicated? For example, what if you want the hero’s screaming voice to also play back at half normal speed as he jumps from the cliff? The Velocity envelope only affects the video portion of the file and leaves the audio to play back normally, so you can’t use the Velocity envelope to accomplish the task. On the other hand, the Playback rate setting affects both the video and the audio. So in this case, the Playback rate setting does the job you want.
However, say you want your hero to start his jump at half speed, but you want him to speed up as he approaches the water so that at the point of impact he’s back up to normal speed or faster. You can’t accomplish that with the playback rate, but the Velocity envelope makes that sequence easy.
Due to the need to handle the audio in an acceptable manner, playback rate is limited to a fairly narrow range. Slowing the audio down to anything below 0.25 times normal speed or above 4.0 times normal speed creates unacceptable artifacts that would make the audio unusable, so the Playback rate cannot pass either of those boundaries. In other words, with the Playback rate setting, you can’t make your event’s video play slower than one quarter speed or faster than four times normal speed.
Since the Velocity envelope doesn’t affect the audio, it can offer a much wider range. In fact, you can set the velocity from -100% (which means the video in the event plays at normal speed, but in reverse) to 1,000% which means 10 times normal speed. This top value of 1,000% is a dramatic increase over the maximum of 300% in previous versions of VEGAS Pro.
Now, recall that earlier I said that all events have a default velocity of 100% of the event Playback rate setting. That means that at the default playback rate of 1.0 and the default velocity setting of 100%, your video plays back at normal speed. But, as we discussed, you can change either setting. So, say you change the playback rate to 3.0 and leave the velocity set at 100%. Now your video plays back at three times normal speed. And remember, so does your audio. On the other hand, say you leave your playback rate at 1.0 and set the velocity to 300%. Your video still plays back at three times normal speed, but now the audio stays at normal speed since, remember, the Velocity envelope does not affect the audio.
So, what does all this math give you? Since the two multiply together for the final result, and the top playback rate is 4.0 while the top velocity is 1,000%, you can play the video from an event back at up to 4.0 x 1,000% which equals 4,000%, or 40 times normal speed. In previous versions of the software, the top-end limit was only 12 times normal speed, so the new top end is significantly higher.
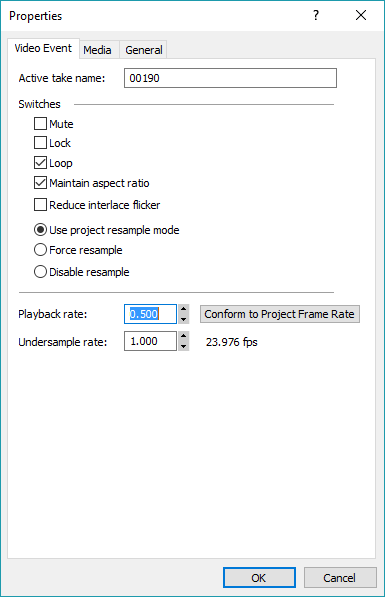
Now that we understand the math, let’s take a look at how to set the values you want, and also how to automate your velocity. To set the playback rate, first add a clip to your project timeline and click a blank spot in the timeline to deselect the events you’ve just created. Right-click the video event and choose Properties from the context menu. On the Video Event tab, type the value you want into the Playback rate text box, or use the arrow keys to move to the setting you want. In Figure 2 I’ve set my playback rate to 0.5 for half-speed slow motion.

Before you proceed, notice another VEGAS Pro 14 new feature, the Conform to Project Frame Rate button. You can click this button to change the Playback rate setting to match the framerate of your project. To understand the value of this, say you shot at a frame rate of 30 fps, your project is set to play at 30 fps, and you want your footage to play at half speed. At half speed, you’ll need twice as many frames each second than your camera provided, so VEGAS Pro resamples your footage to provide the extra frames. By default VEGAS Pro uses a Smart Resample mode to create these extra frames. Of course, this process isn’t perfect because you’re creating something that wasn’t originally there, so although VEGAS Pro does a great job of resampling, you can see varied results.
Many cameras can now shoot at high frame rates, and doing so can make it possible to achieve higher-quality slow motion. For example, say that in the example above you shot at 60 fps instead of 30. When you bring this footage into your project, VEGAS Pro automatically plays it at normal speed. The software actually has more frames than it needs. Since you want half speed, you want to set your playback rate to 0.50. You conveniently shot at twice the required number of frames, so when you click Conform to Project Frame Rate button, the Playback rate for this event automatically sets to 0.5. This of course results in slow motion as usual, but the key is that since the footage provides twice as many frames to work with, VEGAS Pro has all the frames it needs and thus doesn’t have to do any resampling. Naturally, this results in higher-quality slow motion than would be possible with lower-frame-rate footage.
And as long as we’re talking about new features in VEGAS Pro 14, this points to another one. For each event you can turn off the automatic smart resampling, which you would want to do in the case we’re discussing here since you have all the frames you need and thus don’t need resampling. In previous version of the software, you would have to turn resampling off for every event in your project, which could get to be tedious. VEGAS Pro 14 includes a global project property setting which enables you to turn off resampling project wide so that it doesn’t affect your footage unnecessarily. To access this property, choose Project | Properties. On the Video tab of the Project Properties dialog box, choose Disable resample from the Resample mode dropdown list and click OK to apply the change across every event in the project.
Now back to the original plot. Refer back to Figure 2. Once you’ve set your playback rate, click OK to apply the changes. Play your project and notice that the video in this event now plays at half speed, and if the video had audio with it, notice that the audio also plays back at half speed. Also, notice that changing the playback rate does not change the length of the event. This means that since you’re now playing at half speed, you will see only half of your video when you play through the event. If you need to see more of the video, trim the right edge of the event to make it longer. And finally, notice one more important thing: the video event now has a “saw-tooth” shaped line running through it like you see in Figure 3. This visual indicator makes it easy to see that the playback rate of this event has been changed and is no longer 1.0.

Finally, you can use one more extremely handy tool related to playback rate. You don’t always know the exact value of playback rate change that you need. For example, say you have a gap in your project. You have a video you want to use to fill the gap, but the video is 13 frames to short to fill it entirely at normal playback speed. So you decide to slow the playback rate of the event exactly enough so that it lasts for that extra 13 frames. What playback rate should you use to fill the gap? Figuring that out would be an annoying drain on your time and editing efficiency. VEGAS Pro makes it easy to do very quickly.
Point your mouse to the edge of the event. Notice that the Trim mouse icon appears. Now, hold the Ctrl key as you point to the edge of the event, and you’ll see the mouse icon becomes modified with a saw-toothed line. When you have this icon, trim the edge of the event. Now, not only do you change the length of the event, but you also simultaneously adjust the event’s Playback rate setting. This is by far the fastest way to create slow or fast motion for an event. After you’ve done this, you can look at the Playback rate property to see the exact setting if that’s important to you.
Now that you know how to use the Playback rate setting, let’s talk more about the Velocity envelope. First, let’s create the same half-speed slow motion as we created a moment ago with Playback rate. Either start with a new event, or set the Playback rate of the event you’ve been working with back to 1.0. Now, right-click the event and choose Insert/Remove Envelope | Velocity from the context menu. A green automation envelope line now runs through the event. Point your mouse to the point at the very beginning of the envelope, and a ToolTip tells you the point’s current setting, which (assuming you haven’t already changed it) is 100%.
Now, drag the point all the way up to the top of the event. The value reads 1,000%. Drag it all the way down and the value reads -100%. Double-click the point to reset it to its default value of 100%. Now drag the point to 50%. You’ll quickly find that an exact value is not so easy to hit. With such a wide range of possible values, any small movement translates to a large change in the percentage value. To make it easier to hit 50% exactly, first drag the point to somewhere near that value and then hold the Ctrl key as you drag the point. This limits the change to much finer increments and makes it easier to hit an exact value.
If you’re still having trouble getting to the exact setting you want, right-click the point. The context menu gives you several options including a preset for 50%. If the value you want doesn’t have its own preset, choose Set to from the context menu. Enter your exact value and press OK to finalize the change.
Once you’ve set the point’s value to 50% play your project and notice that the slow motion created this way looks identical to the slow motion created with the Playback rate setting. However, the audio has not been altered. In this case, the green envelope line serves as your visual reminder. Just as when you changed the playback rate earlier, adding a Velocity envelope does not change the event’s length, so you’ll see only half of your video
Let’s push the Velocity envelope a little bit and see what else we can do with it. Earlier we talked about a sequence where the video starts in slow motion but then speeds up over time, so let’s create that effect.
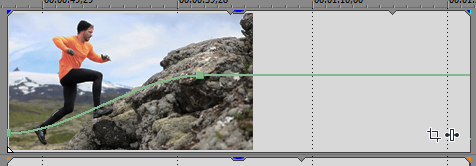
Envelope lines can have as many points as you want to give them, and each point can have a different setting. So with your first point set to 50%, right-click the envelope line later in the event and choose Add Point from the context menu. Or, just double-click the envelope. Either of these methods adds a new point to the line. Set this second point to 500%. In Figure 4 you can see that the envelope now slopes up from 50% to 500%. You can also see another helpful feature in Figure 4. Notice that the top edge of the event has a small triangular notch in it. This notch indicates the end of the media contained in the event. Since the velocity has been increased so dramatically, the media no longer matches the end of the event (remember; changing the velocity or playback rate does not change the length of the event.) In this case, since you’ve sped your video up, it finishes before the end of the event. When you play through this notch, the video starts over again. You can easily trim the event and snap the edge to the notch so that once again the length of the event matches the length of the media.

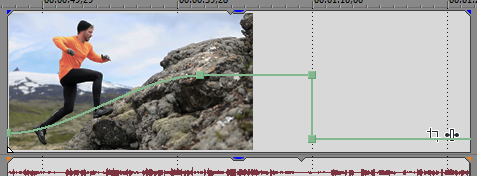
Now, maybe you want the video to play at 500% for a while, but then freeze at a certain frame. You can easily accomplish this with the Velocity envelope too. Add a new point at the frame you want to use as your freeze frame. Then create yet another point just to the right of the last point you placed. Drag the newest point down and to the left until it sits directly under the previous point. Finally, right-click the last point and select the Set to 0% Velocity preset from the context menu. When you play the project, you see that you’ve automated the velocity so that it starts in slow motion, speeds up drastically, and then freezes on the frame you chose and stays on that frame until the end of the event. Figure 5 shows what my envelope looks like.

The tools we’ve discussed in this article give you great flexibility for creating slow and fast motion. The increased velocity range makes super-high-speed sequences easily attainable. As you’ve seen, you can also create freeze frames, slow motion, reverse motion, reverse slow motion, and more. And you can change all of these settings over time. You can also easily let VEGAS Pro do the math for you if you’ve shot with a high-frame-rate camera and want to use those extra frames for beautiful slow motion.
At first glance, the new higher limit on the Velocity envelope might seem like a minor detail. But when you start digging into all of this, and when you need a super-fast-motion sequence, you quickly learn that the higher limit is an important facet of a comprehensive set of tools that help you solve all kinds of problems and create great special effects.
