No one can deny that vintage is a trend nowadays. Also, no one can deny that watching a VHS video gives us that nostalgic feeling – which feels great, right? That’s why I want to
explore with you some ways to simulate a VHS look using VEGAS native tools.
First things first: we have to analyze every aspect of a VHS video. A quick search on Google Images can reveal us some references to create on our own composition. For example: a
4:3 pillarbox is essential to our comp. Also, we can see that many VHS camcorders always add some “red-ish” colour overlay to the videos. And we can’t forget about all the noise,
interferences and dust that makes every frame, let’s say, really unique.
Let’s start out our composition. Create a project using the same properties of the video you wish to destroy, because that’s what we’re going to do (I insist: don’t forget about the noise
and dust I’ve mentioned before). Don’t create a project using 4:3 aspect: we’re going to add a “fake” pillarbox, I’ll explain why this later. Go ahead and also import your video to your
timeline.
I suggest creating this project exclusively for this effect – if you wish to apply the effect to a small portion of a long video, I suggest you to export this portion and create another project
for this purpose. You’ll see that it’s not only the video that is going to be destroyed here.
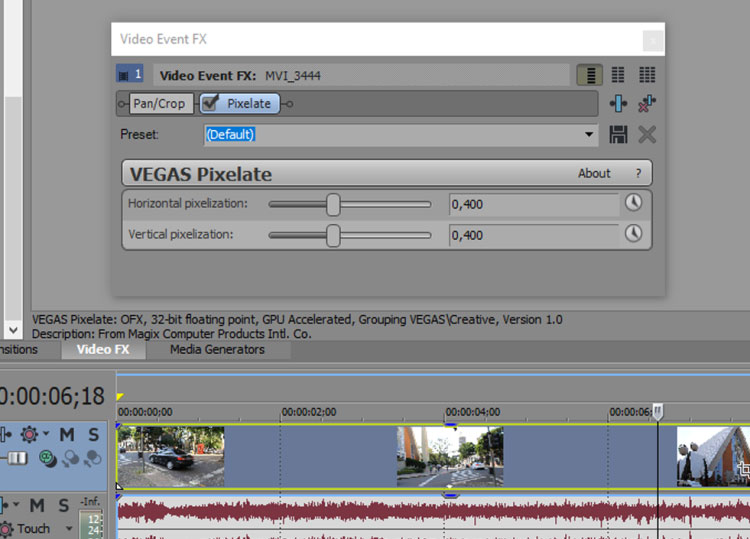
The first thing we’re going to do is pixelate our video. Add a VEGAS Pixelate plugin to your event and add some as you wish. Here I’ll use 0,4 for horizontal and vertical.
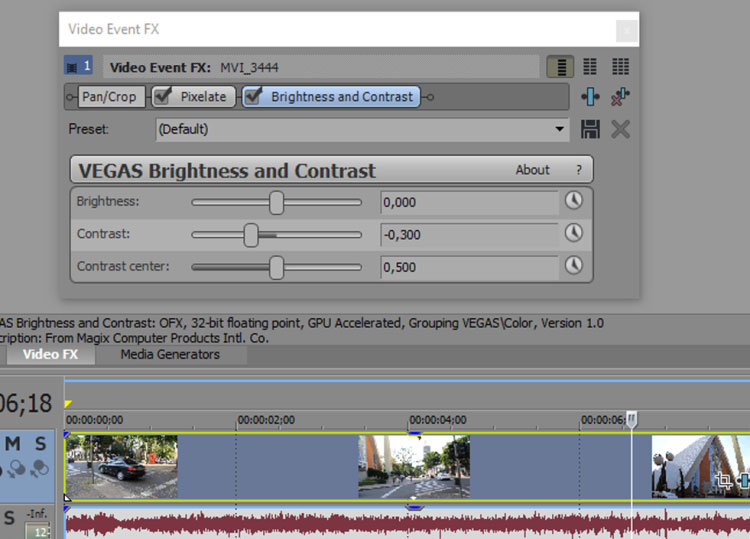
Next, we should bring our contrast to a lower level. Use VEGAS Brightness and Contrast on the event to lower the contrast to something about -0,3.
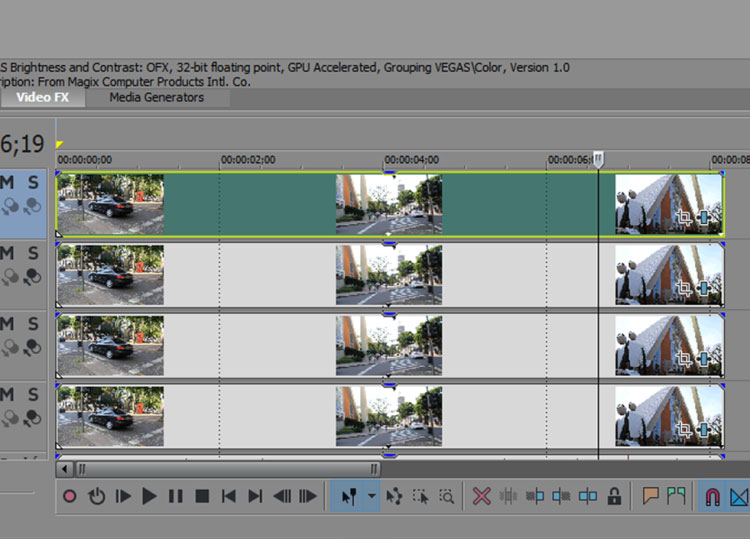
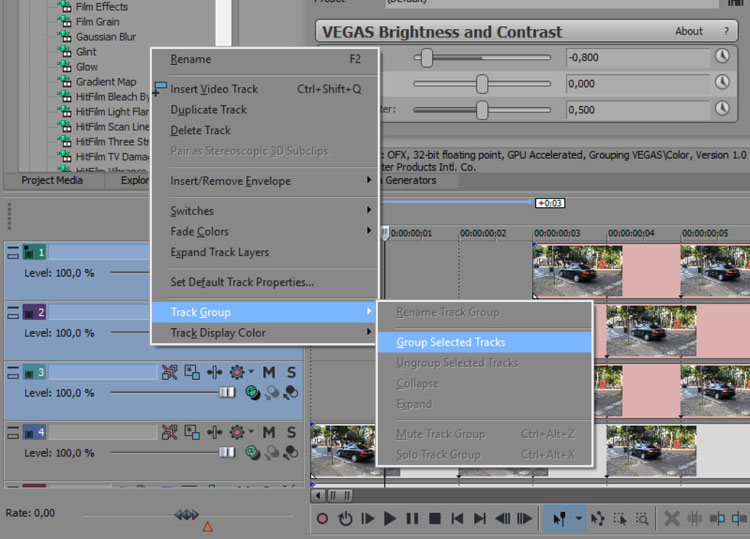
The next thing you’re going to do may seem a bit odd, but that’s not a problem at all – we’re going to hide that “oddness” later. Create 3 new video tracks above your original video and
duplicate your event 3 times (you can use the old CTRL+C/CTRL+V method, but I highly recommend you to evolve and use CTRL+Drag). Put each one on a track, just like the image
below.
We’re doing this because now we’re going to create something that also happens on every VHS record: chromatic aberration. To do this, we will add VEGAS Channel Blend to those
events we have positioned above our original event. Add the “Red Only” preset to the event on track 01, “Green Only” to the event on track 02 and “Blue Only” to the event on track 03.
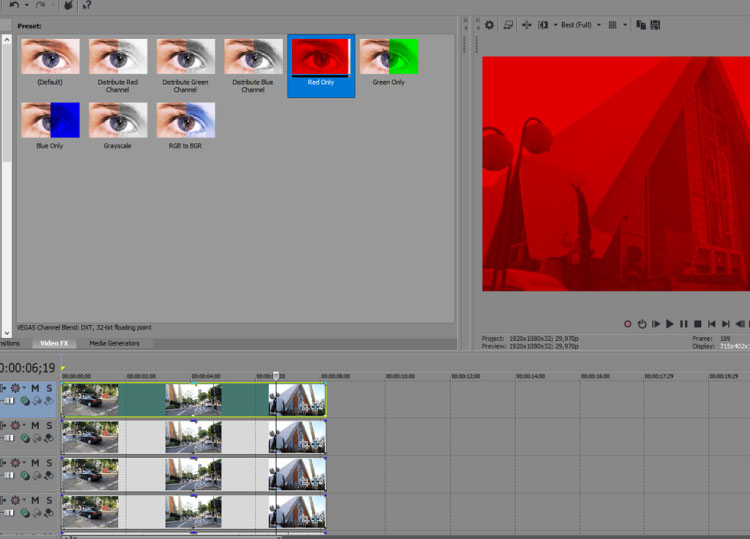
Now, change the Compositing Modes from track 01, 02 and 03 to Add.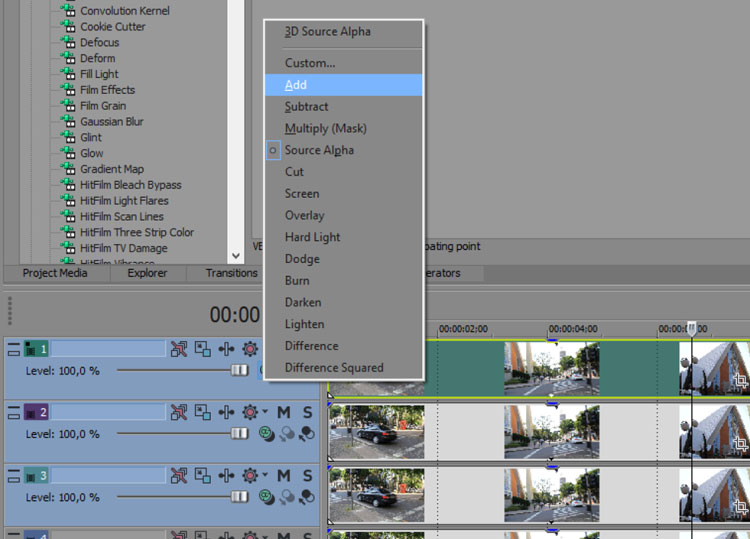
Next, let’s remove the brightness from those three events. Use VEGAS Brightness and Contrast on each event to lower the brightness to a level about -0,800. Of course, leave the
event on track 04 alone for this time.
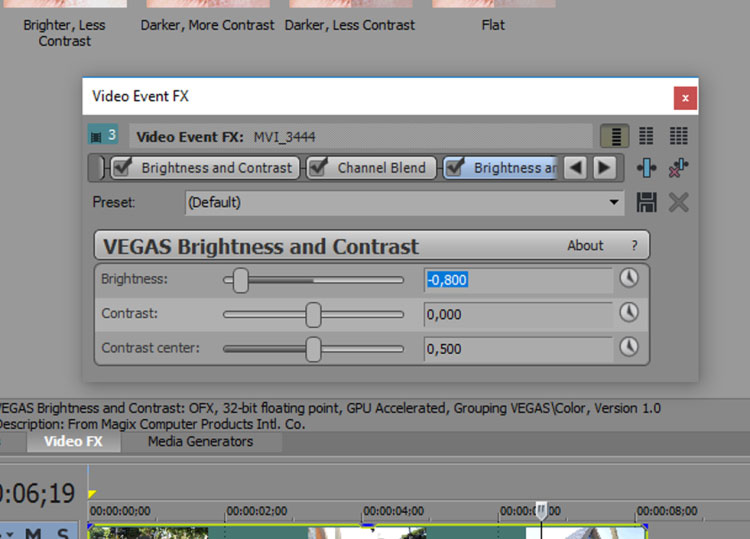
The last thing you will do to create the Chromatic Aberration is to reposition the events some frames ahead: the event on track 03 should go 1 frame to the right, the one on track 02 will
go 2 frames, and the event on the first track must go 3 frames to the right. Yes, the goal is to build a staircase inside our timeline.
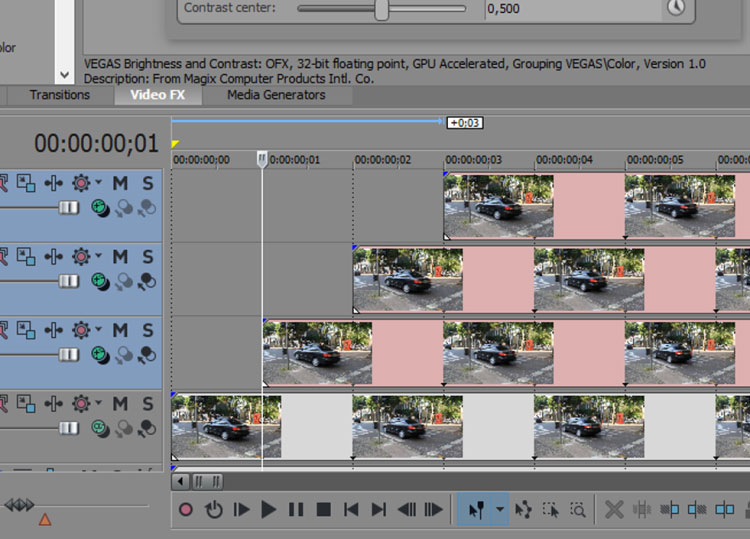
Remember when I said that we would hide all this mess? That’s right: you might group those 3 tracks above our original event (select the tracks with CTRL+Click, then Right-click ->
Group Selected Tracks). This will make things much cleaner on the timeline.
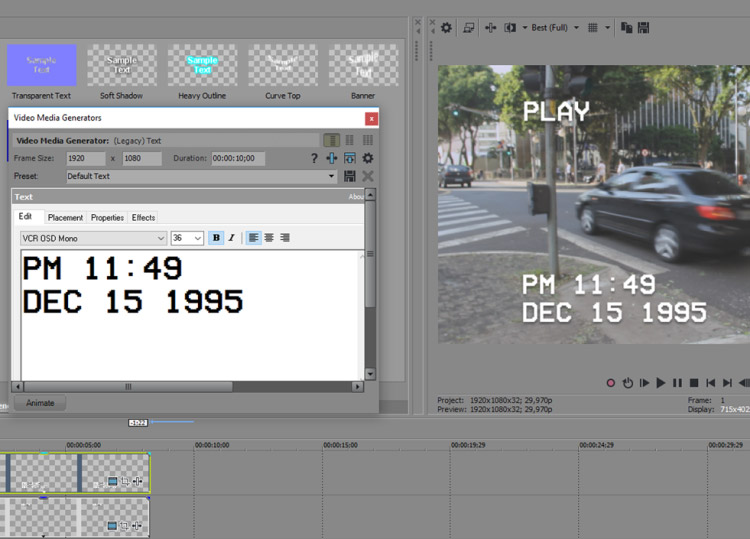
Now is the time that you will put your creativity to work: create some overlay texts with VEGAS Titles and Text to really sell the effect. Here, I’ve created a “Play” text that goes on
the top of the video, and then created a timestamp. Be creative: the timestamp can be your birthday, the same day when you are editing the video but 20 years ago, pretty much
anything. Have you ever heard about “easter eggs” that directors put inside many Hollywood films? That’s it: those texts you’re creating are a great opportunity to add your own easter
egg. Also, don’t forget to use a pixelated 8-bit styled font, and add some shadow to it.
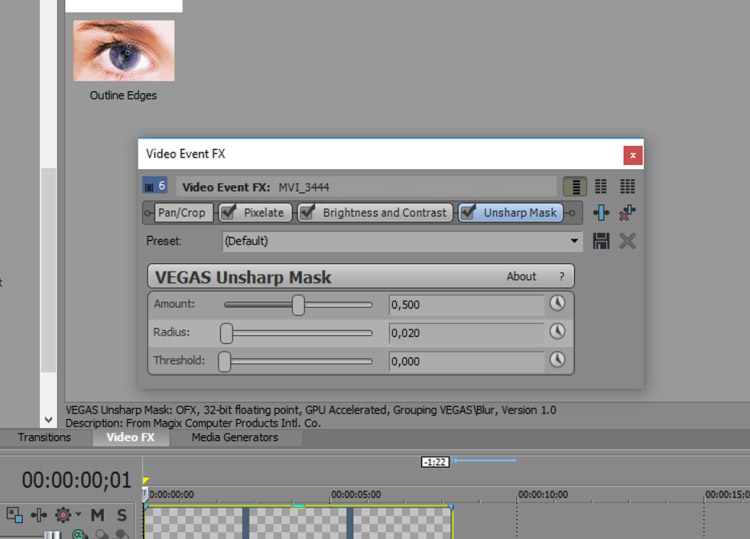
Add the VEGAS Unsharp Mask to the original event to create that “over-sharpen” look. Amount on 0,500 and Radius on 0,020 is great.
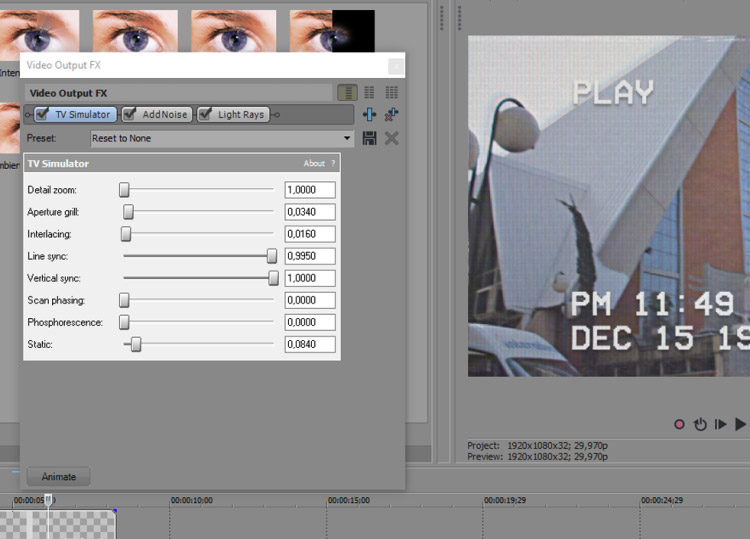
Now we’ll add some effects to our full project. Add a VEGAS TV Simulator to your Video Output FX (directly on the Video Preview). Tweak the settings pretty much as you wish, but
remember the goal is to create a realistic VHS/TV look, so don’t overuse it. Remove a bit of the Line Sync, add some Aperture Grill and Static, and also some Interlacing. Of course, the
values I’ve used on my composition are on the screenshot below.
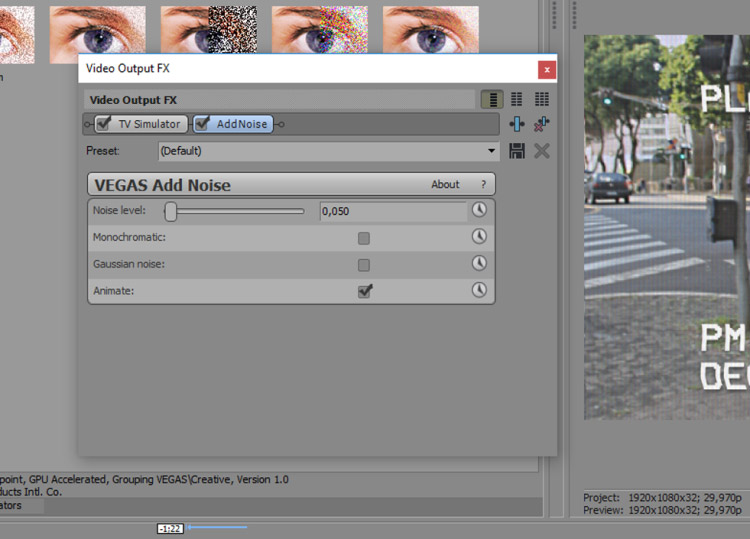
We have to add some noise to our video. Don’t forget that noise and grain are the main features of the VHS look. Add the Add Noise plugin to your Video Output FX and change the
Amount value to 0,050. Let’s make it subtle.
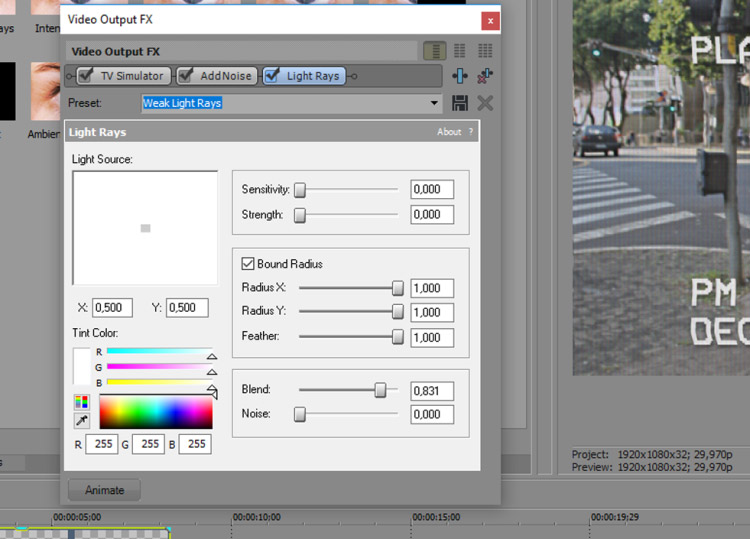
To create a cool vignette, we will add a VEGAS Light Rays plugin to the Video Output FX. Just activate the Bound Radius feature and put every value there on maximum to create the
look. Then, change the Blend parameter to match what you are looking for on your composition.
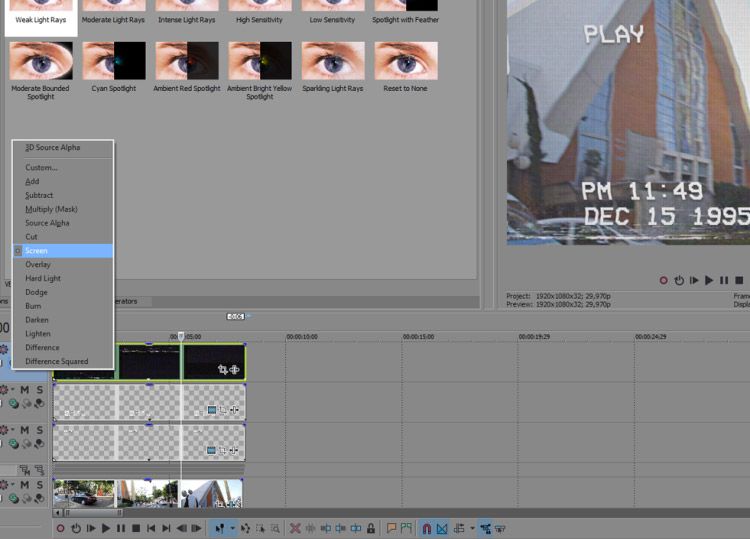
The next step is to add some interference to our video. You might search for “VHS Glitch”, “VHS Interference” or “VHS Overlay” on YouTube (or other stock footage website) to
download some free stock footage (yes, you may find many of them on YouTube for public use. Just be sure to look at the description of the video you want to download, we don’t want
anybody to have a lawyer knocking on their door because of a simple download). Add it to a new track on the top of the timeline and change its compositing mode to screen to remove
the black background.
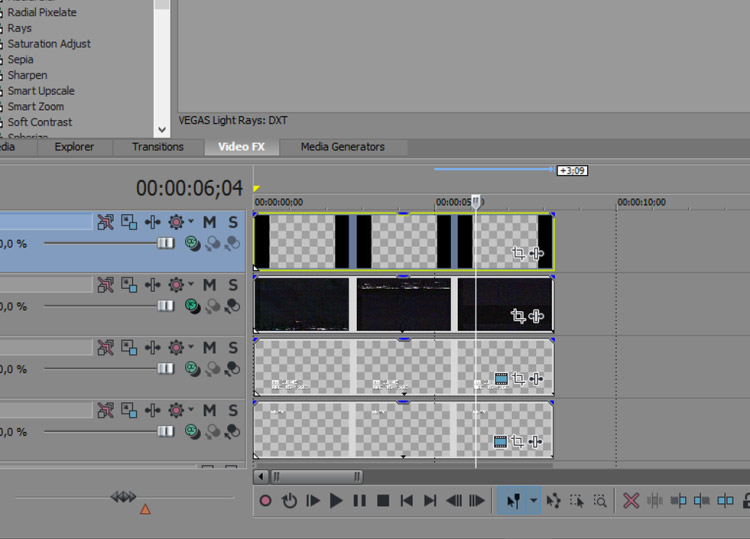
Now, let’s add our pillarbox. Get some .PNG 4:3 aspect pillarbox to add on your project and place it on a new track on the top of the timeline, above everything. We’d rather add the fake
pillarbox than creating a 4:3 aspect project because with a fake one we’ll be free to reposition our videos (with Pan/Crop and Track Motion) without losing any information on our
proportion. If we create a full 4:3 project, all the information that goes off the proportion might be lost.
The last step for our VHS look is to add that red-ish colour to our video. Add a Color Curves to your Video Output FX and use the curves to remove the green and blue, and create a
small curve on the red to make it stronger.

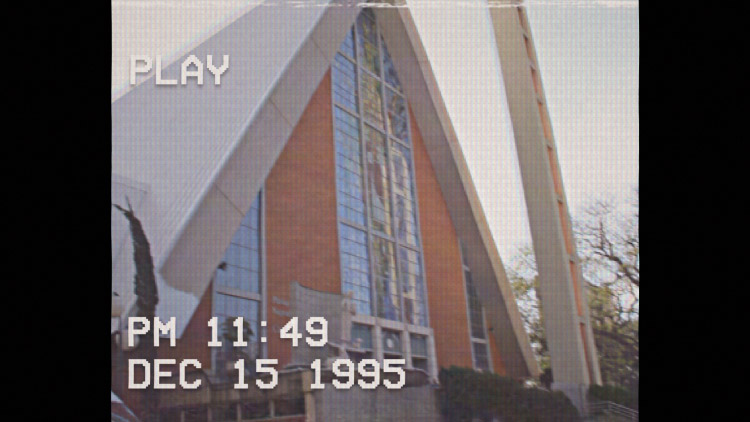
Your final result should be looking like this:
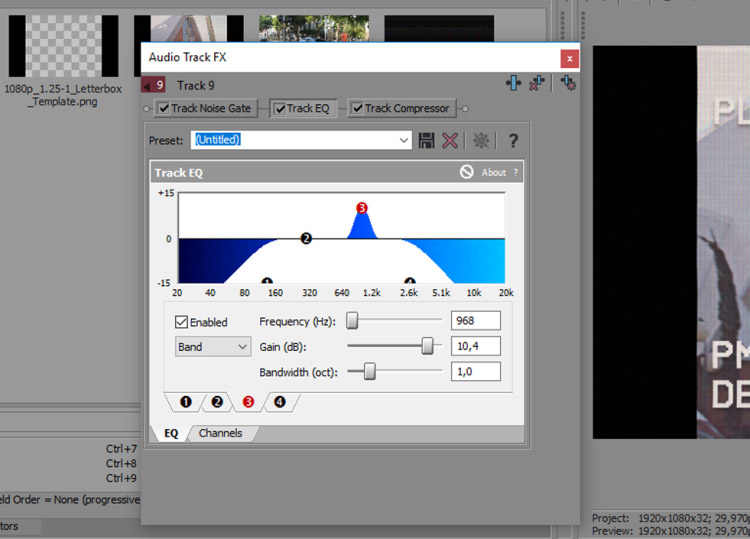
BONUS: you might add some cool FX to your audio, too! It will help to sell you effect even more. Use the Track EQ to remove the bass and treble, and rise the power on the
mid-frequencies (between 600Hz to 1.2kHz).

About Mateus Ferreira: Mateus Ferreira is a video editor from Brazil, and has been editing videos with VEGAS Pro since its version number 9 (2009). Also, he has been sharing his video editing techniques in his portuguese-spoken YouTube channel Brainstorm Tutoriais, which has more than 330K followers and over 18 million video views.
Follow Mateus
YouTube Channel: http://youtube.com/brainstormtutoriais
Facebook: http://facebook.com/brainstormtutoriais
Twitter: http://twitter.com/brainstormt
Instagram: http://instagram.com/mateus.wmv
Awesome post.