
It is rare to come home from filming and then find that the video you recorded accurately reflects the natural colors you perceived while filming. Digital video cameras and smartphones often react to various lighting and color combinations automatically to generate the best quality image. However, often your footage still needs color correction in post production.
In this article, we go over basic techniques and knowledge for use in color correction with VEGAS Movie Studio (14). While the video effects, new LUTs (lookup-tables) and Video Scopes in VEGAS Pro 15 offer a more advanced color correction workflow, the tools available in Movie Studio 14 plus an accurate reference monitor and a trained eye are enough to make dramatic improvements to footage.
What exaclty is color correction? Is it different from color grading?
First, we’ll deal with some basic knowledge surrounding the topic of color correction, which is different from color grading. Color correction is the adjustment of the intensity of color, as well as the compliment of color in a scene to create a natural or realistic effect. Its purpose is to “neutralize” or compensate for the influence of factors which affect the perception of color. On the other hand, color grading‘s primary purpose is to create a stylized or aesthetic effect through the addition or removal of colors.
There are a number of terms, which one hears when talking about color and color correction. Hear are some of the most common ones:
- Lows: the hue of your black tones
- Mids: the hue of your gray tones
- Highs: the hue of your white tones
- Saturation: the intensity of spefic color wavelength (100% results in pure color, 0% saturation results in grayscale)
- Gamma: the value for encoding or decoding brightness (or luminance)
- Gain: adjusts the luminance (intensity of brightness) of your video
- Offset: adds an offset to all luminance values in the video.
Some other very important terminology refers to the relationship between colors as they exist on the color wheel. On the color wheel, two colors 180 degrees opposite of one another are complimentary colors. Analogous colors are groups of three colors nearby one another on the color wheel that share a common color. These relationships evoke a certain look, and this knowledge can be useful for color grading, as well as making artistic choices. To read about the psychology of colors as well as color combinations, you can read this article.
What is the best way to color correct in VEGAS Movie Studio?
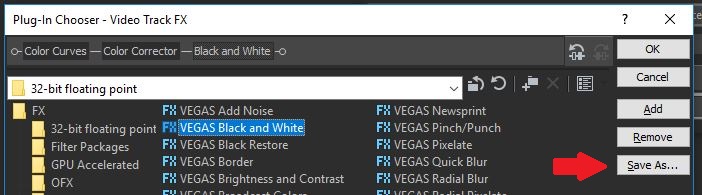
There are a number of tools in VEGAS Movie Studio and VEGAS Pro. As you become more familiar with the software, you’ll begin to find the tools which fit into your workflow most directly and give you the results you want. In this case, we will work with the Color Curves tool and the Color Corrector tool, which are available in both the VEGAS Pro and Movie Studio versions. For the purpose of creating a great look quickly, the Color Curves tool helps to improve the contrast and definition of your scene. Then, the Color Corrector tool helps fine tune the levels of color to compensate for any issues with white balance and oversaturation. Click the “fx” button on your video event or video track to open the Plug-In Chooser (or click the Video FX tab to open the video FX window) and add the following effects to the effects chain: VEGAS Color Curves, VEGAS Color Corrector, and VEGAS Black and White.
Using the Color Curves Tool
The Color Curves tool adjusts the red, green, and blue channels with an adjustable envelope. Although this tool can modulate much more than this, in this instance, we will use the Color Curves tool to correct issues with brightness and contrast which offers the impression of a detailed exposure. With the Channel set to “RGB”, your curve adjusts black tones in the lower left corner of the graph and white tones in the upper right. Should you move the white endpoint vertically along the y-axis, you will increase the amount of black in your white tones.

Along the color gradient line, you will see two points connected by a thin line to the black and white endpoints. These are the tangents for the color gradient of the black and white (respectively, the low and high) tones. As in the image of the Color Curve tool, you should reposition these tangent points to create an S-shape until you find a pleasant-looking mix, in which all objects in your shot are definied, but not too dark or too washed out. Regularly deselect and reselect the checkbox to the left of the effect name in the video effects window to bypass the Color Curves tool. Furthermore, the proper exposure and contrast settings in color footage will also look good in black and white. To double check your Color Curves settings, use the Black and White effect to confirm the changes you’ve made yield good results for the detail and contrast of your video.
Once you think you have found a good relationship between the tangent points, scrub through your video event quickly to make sure that you don’t see any frames that are too dark or light.
Using the Color Corrector Tool
Now, let’s move on to correcting for color. With the Color Corrector plug-in, you independently adjust the characteristics of low, middle, and high color tones. A point’s angle determines the hue you are adjusting, and the distance from the center determines the magnitude, or saturation of that hue. If you have a video clip which has a yellowish-orange cast to it, you can add the complementary color between blue and cyan and thus nuetralize the undesireable tint.
The easiest points to start with color correcting a frame are in areas where you should see white or black. If your scene needs color correction, the blacks won’t have a rich black and the whites will look off color, which will in turn make the entire frame look not quite right. With the Complementary Color eyedropper tool, you can automatically compensate for oversaturated colors in your highs. Simply select the Complementary Color eyedropper tool (” ![]() “) for your highs and find an area in your image you want to have a neutral white hue (or left-click and drag to sample a region). This selects the complementary color in the High color wheel, and you can then make fine adjustments to the color if necessary.
“) for your highs and find an area in your image you want to have a neutral white hue (or left-click and drag to sample a region). This selects the complementary color in the High color wheel, and you can then make fine adjustments to the color if necessary.
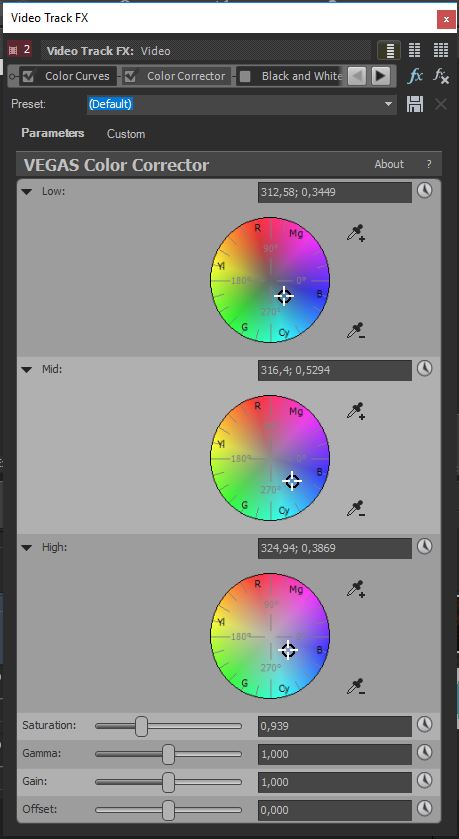
With the highs compensated for, you can move the position of the lows and mids to further refine your colors. The correction necessary for your lows and mids will often follow suit with the highs and need the same color correction, although the amount (magnitude) of the color may differ. As you correct for color, you might find that some colors develop a problem with oversaturation. In that case, it might be necessary to reduce the saturation in small increments from its default at 1.000 to reach a desirable color level.
Once you have a shot that is pleasing to the eye, review your footage to check for oversaturation or anomalies. From here, you can add another Color Correction plug-in or the Color Correction (Secondary) plug-in to get into color grading.
Saving Presets for Color Correction
If you need to select a specific plug-in package as a part of your workflow, you can speed up your workflow by saving the effects chains and the individual effects settings as presets.
Simply choose “Save as…” in the Plug-in Chooser to save your effects chain under a user-defined name. Later, you can load this plug-in package from the “Filter Packages” folder in your Plug-in Chooser.
Then, once you’ve found basic settings for correcting the color of your footage, click the “Save” icon (circled in red below) in your video effects window. You can then recall these settings in the “Preset” drop down menu to the left of the “Save” icon.

The Final Wrap
VEGAS Movie Studio 14 Platinum offers a number of plug-ins and video effects for color correction and color grading. To experiment with the color correction workflow of Movie Studio 14 Platinum, as well as all of its other great features, click here to download a free 30 day trial version.
Take Color Grading to the next level with VEGAS PRO
VEGAS Pro includes an astonishing new feature which makes color correcting and color grading both easier and far more powerful. You can now explore all of your color grading essentials into one place with the new Color Grading panel, even with HDR footage.