
VEGAS Pro software gives you great flexibility to configure your workspace in exactly the way that works best for you. In this article, we’ll take a look at the first 10 of 20 techniques that we find useful for organizing workspaces.
Technique One: Dockable windows
Many of the windows in the VEGAS Pro interface are moveable and dockable. This enables you to rearrange the windows in your workspace to suite your particular needs. The default VEGAS Pro configuration includes several windows docked to the top area of the interface, called the Window Docking Area. Some are positioned over others. To access those, click their associated tabs. For example, several windows including the Video FX window sit under the Project Media window. To view the Video FX window, click the Video FX tab.
You can add windows to or remove them from this docking area. For example, to remove the Video FX window from the docking area, drag it by the six vertical dots (the drag handle) away from the docking area. When you get far enough away, the window takes on the appearance of a normal floating window with a title bar and you can place it wherever you want. Release the mouse button. The window now floats above the interface.
To dock the window back to the window docking area, hold the Ctrl key and drag the window by the title bar into the area. When it gets close enough to the docking area, it snaps into place and resumes the appearance of a docked window. You can dock the window back in its original location, in one of the other existing panes of the docking area (on top of another window), or create a completely new pane in the docking area for this window.
You can also change the width of the panes in the window docking area. To do this, drag the bar that separates two panes. To change the height of the window docking area, drag the bar that separates it from the timeline below it.
Technique Two: Avoiding docking behavior
Sometimes you want a window to float, but you want to position it near the window docking area. As you’ve seen, if you drag a floating window close enough to the window docking area while you hold the Ctrl key, it docks to the area. However, you can avoid the docking behavior.
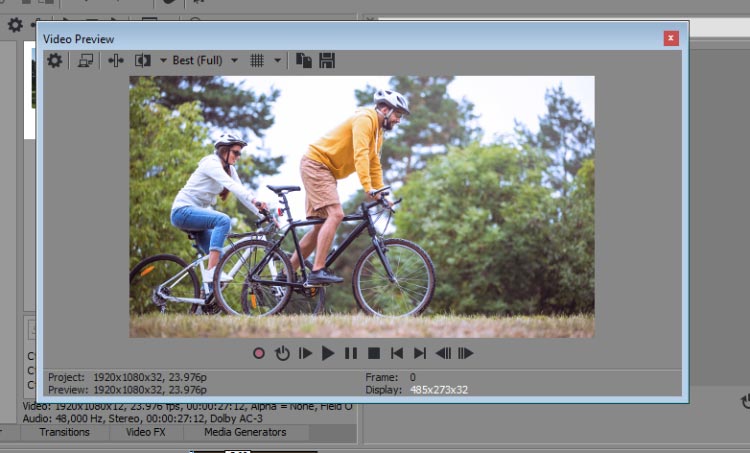
To see this, first drag the Video Preview window out of the window docking area and let it float. Now, drag it back to the window docking area, but don’t hold the Ctrl key. This avoids the docking behavior and you can position the window as close to the docking area as you want without docking it as shown in Figure 1.
When you’re done experimenting, dock the window back to its original location.
Technique Three: Maximizing a docked window
When you have several panes in the window docking area, you may not be able to see some of the windows entirely since the pane may be too narrow to hold everything. Earlier we mentioned that you can resize the pane and that’s one good solution to the problem. But you can also maximize any window in the docking area so that it occupies the entire width of the area.
To see this, open a project that has several files in it. Click the Project Media tab if you need to in order to bring that window to the front of the window docking area. Click the Views drop-down button and choose Details from the drop-down list. You now have a scroll bar at the bottom of the window. Scroll to the right and notice how many columns of information are hidden beyond the edge of the window.
To see more of the information, click the Expand button just above the six vertical dots. This expands the window so that it takes up the entire width of the docking area and you can obviously see much more of the information without scrolling. Click the Collapse button to set the window back to its normal width.
Technique Four: Hiding the window docking area
To hide the window docking area and make it possible to see more tracks in your timeline, press F11 on your keyboard. Now the timeline occupies all of the VEGAS Pro window’s vertical space. Press F11 again to show the docking area again. Now, press Ctrl+F11. This hides the docking area as well as the track header area on the left. Now your timeline occupies the maximum amount of available space in the VEGAS Pro window. Press Ctrl+F11 again to set the interface back to normal.
Technique Five: Automatically hiding the window docking area
You can also set VEGAS Pro up to hide the window docking area most of the time and have it show up only when you want it. To do this, choose Options | Preferences and click the Display tab. Select the Automatically hide docking area checkbox and click OK.
Now, click the timeline. The window docking area disappears. To show the area again, either press the F11 key as you learned to do in Step Five, or double-click the splitter bar between the timeline and the button bar. When you’re finished choose Options | Preferences and click the Display tab. Deselect the Automatically hide docking area checkbox and click OK to turn this preference off.
Technique Six: Floating docks
The window docking area is not the only place you can dock your windows. You can create separate docking areas and put as many windows into them as you’d like to. For instance, we often keep our Track Motion and Video Track FX windows open while we work since we use those two windows so frequently. But it would be unusual that we would need to access or view both windows at the same time, so docking one on top of the other makes good sense. Neither of these windows appears in the window docking area by default and we don’t find it helpful to have them there. We prefer to position them on my second monitor. Floating docks provide a great solution in this case.
To create a floating dock that contains these two windows, first click the Track Motion button on any video track to open the Track Motion window. View the window in floating mode. Next, click the Track FX button for any video track. Select a plug-in from the Plug-in Chooser dialog box and click Add to add it to the plug-in chain for that track. Click OK to close the Plug-in chooser dialog box.
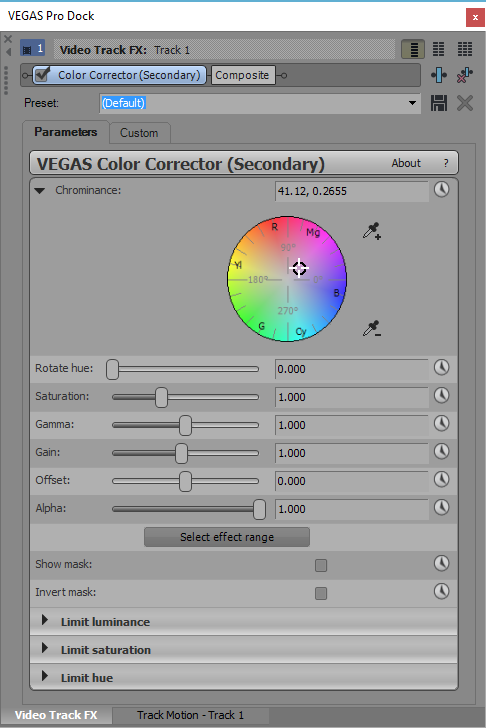
Now, hold the Ctrl key as you drag the Video Track FX window onto the Track Motion window. When you get close enough, the Video Track FX window switches into docking mode. You can create a new docking pane so that both windows are visible simultaneously, or you can drop the Video Track FX window directly on top of the Track Motion window so that they occupy the same space in the dock as in Figure 2. Do that now. Then, use the tabs to switch back and forth between the windows in the floating dock.
Finally, you can reposition the floating dock. Drag it by its title bar and position it where it makes most sense for you. For me, that usually means on my second monitor
Now remove the two windows from the floating dock so that they float separately and close them.
Technique Seven: Multiple monitor support
Now that you know how to move windows around, you can take full advantage of your entire workspace, even if that workspace is spread across more than one computer monitor. We mentioned using multiple monitors a bit earlier. One useful approach involves moving the windows that you use most often off of the monitor that holds the VEGAS Pro timeline and positioning them on a second monitor. This enables you to create more space for the timeline.
To move a window to a different monitor in your setup, just drag the window to the monitor you want to show it on.
Technique Eight: Managing window layouts
With all of these layout adjustment possibilities, you may soon find that you have more than one favorite configuration. For instance, you may like one setup when you’re in video editing mode, another when you’re focusing just on audio work, and yet another when you’re in color-correction mode. Rather than to manually adjust your layout every time you switch to a different task, you can save and recall your favorite layouts.
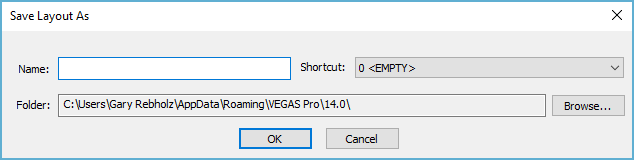
Drag the Video Preview window to float over the timeline. Let’s use this as a simple example of an alternate configuration. To save this configuration, choose View | Window Layouts | Save Layout As. In the Save Layout As dialog box shown in Figure 3, give the configuration a name and assign it to one of the 10 shortcuts in the Shortcut drop-down list. Click OK.
Now, close the Video Preview window. To get back to your custom layout, choose View | Window Layouts and then choose your layout from the list. To return VEGAS Pro to the default window configuration, choose View | Window Layouts | Default Layout. The interface returns to its default configuration.
Technique Nine: Naming your tracks
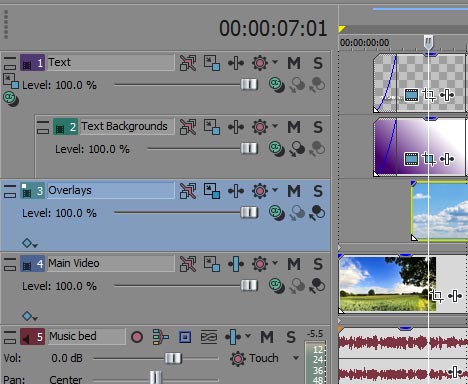
Each track, whether audio or video, has an area known as the Scribble Strip into which you can type a name for that track as shown in Figure 4. To do so, double-click the Scribble Strip for the track you want to name. Now, type the name you want to give the track and press Enter. Naming your tracks goes a long way toward keeping your project organized.
Technique Ten: Color coding your tracks
Each track in your project has a color assigned to it. You can see this color in several places. First, the numbered track icon displays in the track color. For audio tracks, the track color also shows up in the audio waveform in events on that track. Finally, when you click an event to select it, the track’s color is used to highlight the event as selected. Thus, two events on separate differently-colored tracks will be highlighted using different colors.
All of these color cues help you stay organized. You can further take advantage of these colors when you assign colors to tracks manually, thus overriding the default color that VEGAS Pro gave each track. To set the track color, right-click the track icon for a track and choose Track Display Color from the list. Then select the color you want from the list of colors.
You can use this technique to color code your tracks into logical groupings as you can see we have if you look back to Figure 4. For instance, say the first three tracks in your project are all related somehow. Maybe they’re all part of a composite of tracks that make up a lower third or related in some other way. You can change the color of these three tracks so that they each use the same color. You can do this one at a time, or select all three, right-click one of them, and set the color of all three simultaneously.
These are just the first 10 organizational techniques that can help you work more efficiently in VEGAS Pro. Take some time to explore these techniques and start working them into your editing process. We think you’ll quickly come to depend upon them to help get your job done. Find out the next 10 techniques.